Saturday 29 February 2020

Crimean Expansion

Late last year I commenced an expansion of the British Crimean army that included the three outstanding regiments of the Heavy Brigade, three battalions of infantry, some command and two artillery sets.

The expansion continues with these two units.

Another field artillery set


And this, the 41st Regiment.


Two more regiments of foot. The 47th and the 49th will follow that will complete de Lacy Evans’ Second Division, that is the focus of this expansion

Next in the queue for the Crimea armies (and Franco-Prussian War in this instance) are some reinforcements for the French cavalry that will increase the number of figures on the stands to three, in line with the British and Russian cavalry.

Friday 21 February 2020

Can’t See the Wood for the Trees

Wargames trees have always posed three problems for me. 

First is that to represent established woods or forests I like tall trees, which means for my preferred 28mm figures they need to be somewhere between 100mm (4”) and 150mm (6”) tall. For fruit trees and smaller less establish plantations trees can be as low as 50mm, which will also suit some of our 15mm games. Some 30 years ago we were fortunate as group to secure a significant stock of the Heki (a German model railway scenery manufacturer) trees when a local distributor quit the market. These met the height criteria, but after all that time were in need of upgrading The problem here is that much of what is around today does not match the quality of the models we bought all those years ago and where quality is available the price is prohibitive.

The second problem is the robustness. Wargames trees get pretty roughly handled. The Heki trees have done us well over the years because they were very well made, but they are definitely showing their age: the plastic trunks are becoming brittle so that some have snapped off the base and branches have broken off or the foam chip used as foliage has either fallen off or has faded. The question is how to create that robustness?

The third problem is their use. I am a visual sort of person and I like my trees and woods to be on bases. The issue this causes is that it can become difficult to move stands of figures within the woods.

Way back in 2014 I posted another (link) article on woods that solved the third problem so problems one and two need a solution.

A couple of weeks ago I saw a model railroad tutorial on YouTube (link) on making trees that gave me an idea. However, this method of construction would not be robust enough for gaming and the weak point I saw in this method was in the trunk, so I thought of an alternative - the old twisted wire trunk. I decided to give it a go.

Taking four lengths of 16 gauge wire, each about 200 mm in length, I folded each in half then roughly twisted them together, making sure that the looped end was untwisted. 

Then the four twisted strands were twisted around each other to form the trunk and lower branches.


In the past when I have used this technique I have covered the wire with toilet paper coated with PVA to get that wrinkled bark look, but in keeping with the desire for robustness this time I chose to apply Sculpey polymer clay. This was quite a quick task and when all the wire was covered I scribed a bark texture into the surface, sculpted a base, fixed part of a bamboo skewer in the top to support the canopy and then baked it in the oven.


Once set and cooled I painted the trunk using Games Workshop Contrast Snakebite Leather thinned 50:50 with medium. Then to give tone I lightly drybrushed it with a grey/brown.


The next step was to create the foliage. This was done by cutting a strip of coconut matting, as shown in the YouTube video, from a hanging basket liner that was about 70 mm at the base and 25mm at the top. This was then cut into squares and then trimmed into irregular round shapes of ever decreasing diameter, divided in half (by thickness) and pushed onto the skewer and fixed with a drop of PVA glue at each level. A bit of trimming with some scissors got rid of the odd unwanted loose fibre.


Before I added the foliage I sprayed the coconut matting black, to give depth.


I then sprayed the foliage area with a spray adhesive and rolled it in some Woodlands Scenics clump foliage I had on hand and left it to dry in the sun outside...to avoid complaints about “that smelly stuff”. And here is the result.


The completion of the first tree got me thinking about how I could do it better. The first thought was why do I need the wire form? All I really need is the base, the trunk and the skewer and I can make the base and trunk out of Sculpey, with the trunk wrapped around the skewer. I think the layers if coconut matting can also be spread out a bit too, to create space a more irregular shape. But all that is a subject for another post.


Monday 17 February 2020

War of Spanish Succession Game


Yesterday on a very humid summer’s day nine of us, eight players and an umpire, gathered around a large table in West Auckland to play a War of Spanish Succession wargame. For my sins the umpire made me Marlborough and commander of the Allied army. After lecturing my subordinates how they must refer to me as “Your Grace” I set up my plan. 

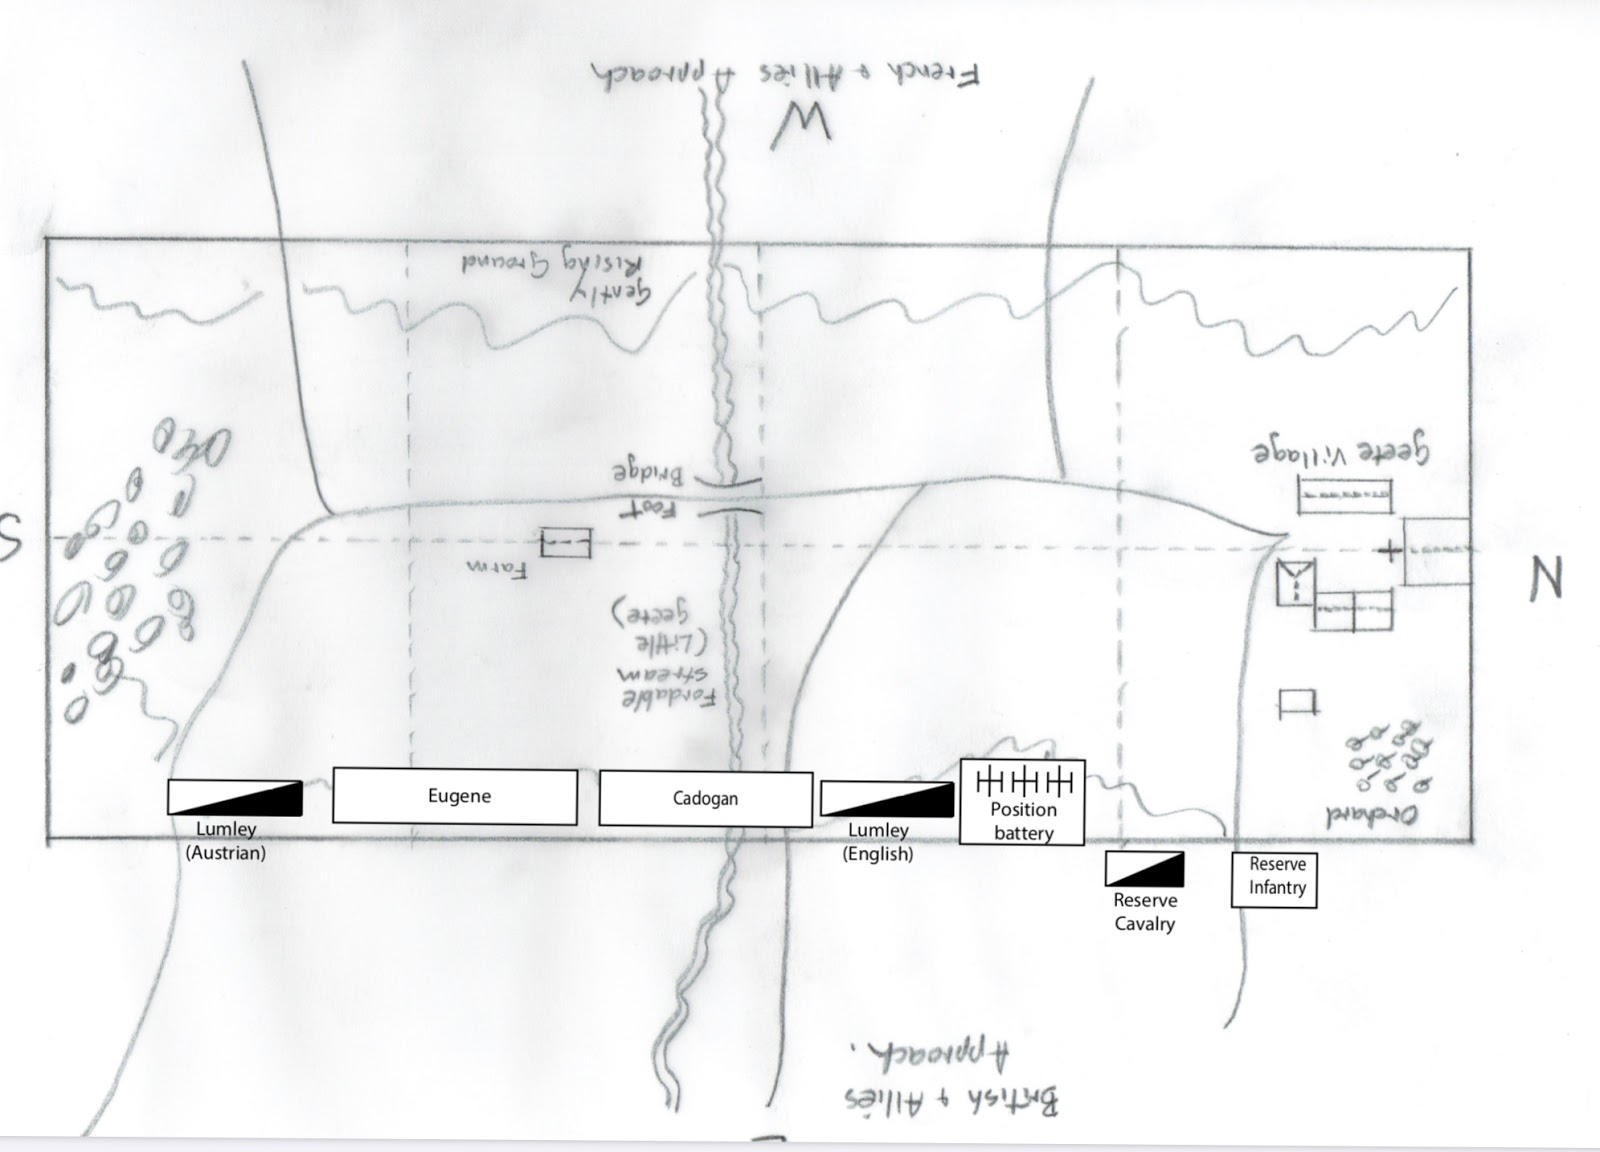
The table was bisected by a shallow stream that ran east-west. A large wood lay on the southern end of the field and a village on northern end. Believing that there was an opportunity to control the north end  of the field with artillery, supported by a portion of the main army and the reserve, I decided to  strike south of the stream with the bulk of the army. The  deployment was as below.


Sadly the enemy was not as obliging at I thought they might be and they held the bulk of their force North of the stream, holding only a brigade of Bavarians and most of their cavalry to the south.

And so the game began.


  The view up the table from the south with our glorious forces on the right.


Eugene’s Austrian infantry, supported by the Austrian brigade from Lumley’s cavalry.


Looking south along the Allied line.

The action started on out left as the Austrian infantry moved forward keeping a solid front against the Franco-Bavarian cavalry. The cavalry tried to smash through the Austrians, but only succeeded in pushing back a battalion of infantry for a heavy loss.


At the same time the Anglo-Dutch moved forward against the Bavarians.


But as the British advanced north of the stream the French infantry moved to the attack. Although raked by the Anglo-Dutch artillery, the French got the jump of the Foot Guards and stopped them dead, but were not driven and the French attack stalled.


The French then found themselves trapped in a vortex of musketry and artillery fire and collapsed.

Finally the Anglo-dutch reserve force arrived, exactly the same time that the French reserve arrived, and almost exactly opposite each other.


The two reserve cavalry forces shaped up against each other and my Dutch troopers got the jump of the French and charged one regiment in the flank. Despite having all the advantages in my favour the dice Gods were not kind to Anglo-Dutch arms and the French didn’t break -  instead they turned to face in the second round of the fight and drove my boys off, taking with them another regiment of cavalry and a couple of guns. Thankfully the Swiss infantry, in Austrian service, held their own and repelled the cavalry.

Lumley’s horse then entered the fray and was perfectly poised to sweep the field...but its first attempt was an abysmal failure thanks to rolling a “1”.  A second attempt was more successful and the French cavalry were driven off, although Lumley’s force was largely destroyed in the process.


In the centre the Austrians and British infantry slowly pummeled the Bavarians and after an extended fight the Bavarians decided they had had enough and quit field. On the far left the French cavalry continued to try to smash through the Austrian infantry, but despite some minor success could not drive the infantry off.

By now both sides were fought out and an end was called. The Allied forces had an edge, but not a decisive one. Both sides claimed victory.

For another view of the same action, see Keith’s (Eugene’s) report here with a lot more pictures than Ibtook.

Saturday 15 February 2020

Generals

While it has been a busy week on the painting table, not much has been completed due to the fact that I mis-ordered six figures and without those six I can’t finish off two units if French Revolutionary infantry.

So all there is to show for my busy week is a pair of British Crimean generals, a Union and a Confederate general.

The Crimean generals below are the General Cathcart and Staff Officer set from the Great War range. Staff officer has been converted into a senior officer with a new head on which I placed the cocked hat. The right arm that was originally holding the cocked hat was replaced by one from a Perry’s plastic ACW set.


The Civil War generals are from the Perry Battle in a Box set.


Saturday 8 February 2020

More Crimean War Turks

This week sees the completion of the third and fourth battalions of the Turkish infantry regiment, supported by a couple of guns sets, for the Crimean War.


This force, as I have stated in previous posts, is intended as a support force for the British and French Crimean armies (pretty much as the same as the similar sized Sardinian force I have). At some point in the future the Turks may expand, maybe with another regiment of four battalions and some cavalry, for operations outside of the Crimean Peninsula. For now this will do.


Here is the whole force deployed for action. The three mounted officers, painted some four years ago now, finally have troops to command.


In earlier post about my ACW experiment I mentioned that I might  be a bit extravagant and make some units in march column. Here is what I am intending for these.


Wednesday 5 February 2020

Terrain Project 2b

Following on from the previous terrain board post I set about building the first of my insert pieces that is going to be some fields for the North American theatres with wooden rail fences.

The first thing was to put an irregular “lip” around the piece. This was done by simply done by cutting the edges of the lip with a pair of scissors, that gives this effect:


I then glued felt on two fields, but wanted the third to be broken earth, maybe even ploughed. Then I went around the ragged edge and glued felt to it, except in a few places where I wanted patches of earth. Once all this felted area is sprayed I will place the fences.


Above the piece before and after spraying

After spraying the sand was applied to the exposed earth areas and when dry were painted.


The fences were constructed from my old standby – matchsticks. I considered using the Renedra fencing, but mine, when fitted, are actually a bit more robust. Once they were built they were sprayed black and then dry brushed into a weathered wood grey/brown, before being glued into position around the fields.


The gates were then built and fitted.

Finally the optional pieces were constructed.

The first is the wheat field. The base is a piece of foamboard with bevelled edges which were covered with coarse sand while the top had a fine sand applied. The whole thing was painted on some brown tones. Then the tedious part began...glueing several hundred pieces of sisal twine to create the wheat. Here the task is just started...


...and the end result.


The second piece is a piece of rough ground, on which a track runs past the fields. For this I used a piece of foamboard. I beveled the edges, cut out the track and added some large boulders, using some bark from the garden, and some gravel for smaller rocks. I added some areas of pre-sprayed felt to get some consistency with the rest of the terrain boards and added foliage, grass tufts, the occasional tree stump or fallen log to break up some of the squareness of the piece.


The third optional piece, that will have the same dimensions as the one above, will have a farm building on it, but I have nothing ready built that will fit in the space so it will have wait until I get the building bug again.

So it was done.


And with the optional wheat field in position.


Here it is fitted into the main board in a three different configurations.


Over the next few weeks I will work on a European variant.

Monday 3 February 2020

Inspiration for More Terrain

Some readers may be aware of the work done by Sergey Mikhaylovich Prokudin-Gorsky


Commissioned by Tsar Nicolas II to photographically document the Empire, Prokudin-Gorsky traveled in a railroad-car darkroom across Russia from around 1909 to 1915 taking hundreds if not thousands of photographs using a three-image colour process. When projected (or displayed on a computing device) these images created a fabulous coloured record of the time.

Apart from the fact that we can see exactly how the costumes of the people appeared in glorious colour, it also captures village and town scenes, many of which represent what Russian villages had probably looked like for 200 years. It is in this latter aspect that the real value lies for me as a lover of wargames terrain. The detail of the images is superb and inspires me to build models of these rustic structures. It also shows me just how much vegetation stands around these villages and makes me think about how I structure villages and towns on the gaming table. You can expect to see some of the ideas illustrated below crop up on these pages in the future.


The Prokudin-Gorskiĭ photograph collection, can be viewed online at Library of Congress here.