Half a dozen posts ago I showed a couple of images of the blockhouse component of a blockhouse and stockade model that will be used to guard a bridge in an upcoming War of 1812 game. Here is the story of the construction of the blockhouse and stockade.
For the blockhouse part of the model I wanted a roughhewn timber structure with a small stockade to one side in which a gun can be mounted on a rammed earth rampart.
The lower level of the blockhouse was set at 60mm square and the upper level at 80 mm. These dimensions are important because I only want four stands to be able to fire from any one face of the building and since the stands size we use has a 30mm frontage it only allows for two from the lower level and two above.
The first step was to cut the basic shapes from cardboard and glue them together.


Next was put the roughhewn or split timber on the face. For this I chose to use balsa, but not milled balsa. I had a 50mm x 50mm block left over from an earlier project, so using a straight edge and a sharp blade I cut strips from the block about 2mm thick. Because all of this was hand cut it had the advantage of creating a variable thickness for the strips, enhancing that roughhewn appearance I notched each piece to appear as though the whole structure was notch assembled.


The roof was made from thin card cut to appear like cedar shingles. I then painted it black, drybrushed a base coat of brown and then dybrushed three coats of ever lightening tan over that, finishing with a vey light dusting of white. A black wash over the shingles and a few water stains on the timberwork finished the job.


For the stockade I wanted to make something a bit different. I wanted the gun ramp to look as though it had been added hurriedly, so part of the stockade was made from rough hewn timber, layed horizontally, while the rest was to be made in the traditional form of vertical sharpened logs, which I built using twigs from the garden. I deliberately cut some long lengths with variable thicknesses and allowed them to dry out in the garage for a couple of weeks, before sharpening the ends. These cut "logs" were then set in an epoxy putty base. The gun ramp was built from a piece of foamcore board onto which I glued some matchsticks and then applied some artists modelling putty and sand to look like rammed earth.


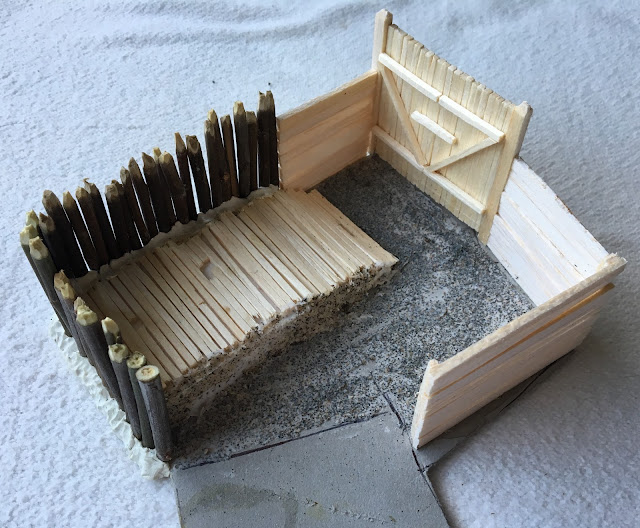
I also needed a giun for the fort but I wanted something that looked as though it had been rushed into service, perhaps something that came from an earlier time and had been modernised. So I went to the big box of bits. I found the trail from a Krupp gun, some wheels from an old Hinchliffe British limber and the barrel from a French 6lb gun. I roughed up the trail a little and assembled it. I left it in wood tones. I think it looks just the part.


And the finished item.


The bridge that this structure will protect in the game is under construction and will be completed in a week or so.
Great work Mark. I need a palisade for my own redoubt - there are some ideas here that I can start with.
ReplyDeleteThanks Nathan. When it comes to a palisade you can't go past a few pieces from a privet hedge...
DeleteHandsome result, Mark! You make building construction appear effortless.
ReplyDeleteThank you Jonathan. This one has been on the work table for the better part of six weeks with a bit being done on it when the lead pile ran low.
DeleteInspired, creative, and so realistic job...Superb!
ReplyDeleteThank you Phil
DeleteVery nice. I hope that you do not mind if I try to make something 'similar'... ;)
ReplyDeleteGreg
No problem. I have since added a couple of things to it - a small stack of barrels and a chimney.
DeleteI like it, brilliant piece of scratchbuilding.
ReplyDeleteThanks, It was a fun piece to make.
DeleteAs always a great looking terrain piece Mark
ReplyDeleteIt was on the work table for quite a while, but came together quite quickly. I have a few other pieces for the War of 1812 game under way or ready to start.
DeleteGreat looking gun emplacement to add to your blockhouse,nice idea to carve the timber planks out of a block and your Frankenstein artillery piece is grand!
ReplyDeleteBest Iain
Thanks Iain. I started making this with some 6mm x 1mm balsa but it looked too milled and too perfect. My home cut versions had just the right amount of variance to look like split timber and I got thicknesses that varied from 1mm through to 2.5mm resulting from the blade running off, which was just the effect I wanted.
DeleteThanks for this post! I found it very educational. The building came out great and I liked learning how it was made. 😀
ReplyDeleteThere is another batch of intersting buildings about to be started - the indian lodges for thr war of 1812. They should start to make an appearence on thr blog in early June.
DeleteGreat job, but the part that unexpectedly nearly brought a tear to my eye was "an old British Hinchliffe limber".
ReplyDeleteI have the same wheels packed away somewhere downstairs, albeit painted in Humbrol chocolate brown. The Hinchliffe artillery pieces were always quite good, from memory.
For their time the Hinchliffe equipment was the best on the market and it is still good, albeit a little undersized. I have a great fondness for Hinchliffe...they were my first metals, tall gangly figures with arms that could pick up cigarettes from the gutter without bending their knees, but they had panache and flair. In our group collection we still have a fair number of them.
DeleteA useful little building... Nicely done...
ReplyDeleteAll the best. Aly
Thanks Aly, it certainly looks the part and I am picking that when we get the French and Indian Wars going it will make a useful outpost....BTW your Paryizan game looked stunning.
DeleteThanks for sharing, that is an impressive piece that you describe in a way that I think I could have a go at doing it. cheers.
ReplyDeleteThank you Norm. I have added a fe of the Renedra barrels in one of the corners that adds some interest.
Delete