Wednesday, 13 March 2024

As Willie Nelson Sang...🎶 On the Road Again...🎶

Bright and early on Sunday...actually it wasn't very bright, in fact it was still very dark at 5:15 AM...we drove to the airport to catch a flight to Tasmania. Three hours and fifty minutes after our departure we landed in Hobart. After the usual stuffing about at the baggage carousel, customs, immigration and rental car booth we hit the fresh air and drove into Hobart to our apartment near Salamanca Place - great name for any wargamer with an even passing interest in the Napoleonic Peninsular War. It was a bit of a grey day and drizzly, but that didn't put us off setting out in the town for lunch and to get our bearings. As the rain settled in a bit we  headed back to the apartment for a 'home cooked' meal and an early night, since we had been up so early. 

Monday was a public holiday and we headed off to the Bonorong Wildlife Sanctuary some 35 minutes to the north of the city. There was a bit of rain falling when we left town, but by the time we got to Bonoring it was all gone. The sanctuary is a nice place where a good number of Tasmanian Devils, Wombats Wallabies and, of course, Kangaroos were able to seen in generous enclosures. Sadly the echidnas found the weather a little cool and were tucked up out of view and the Emus were staying a long way back in their enclosure. We got there about 10:00 AM and were more than half way around before six bus loads of tourists from the cruise ship that was in port came surging through the gates. Perhaps it is the cynic in me, but I did find it mildly amusing to watch some of these people trying to catch their 'instagram moment' with a kangaroo, while the poor animal was looking completely disinterested in the food pellets being offered and just hopped away.

A young and freshly fed Wombat

A roo that was more interested in the hay than any pellets on offer.

A devil ready to bed down for the day.

We stayed about two hours, exited through the gift shop, ate our packed lunch and drove back to town for a walk around the city centre.

The Tasmanian Houses of Parliament

Tuesday, Day 3 of our adventure, saw us heading out on the water to see various points of interest on the lower Derwent River and around the harbour entrance. The water was rather choppy and the ride was bumpy - I was fine with this, but her indoors found it challenging and was pleased to be back on land again. The cruise was a little disappointing really. It was billed as an opportunity to see local wildlife, but we only saw a couple of sea eagles in the distance.

A view across the waterfront with our little boat in the foreground (the sky was not as threatening as it appears here)

The ruggedness of the coastline 

One of the many caves along the shore

At one point our skipper showed us a school on one of the bluffs and asked if anyone knew what famous Tasmanian was educated there. He seemed quite surprised when I suggested David Boon (the cricket player who played 107 test matches and scored 7,422 runs for Australia and holds the dubious record of drinking 52 cans of beer on a flight from Sydney to London in 1989). "Nah," he said, "it was Queen Mary of Denmark, Tasmania's own Mary!" I liked the idea of it being 'Boonie'.

The afternoon was spent doing a bit of shopping around the city. 

Evening drinks are an issue for me at I present as I am not supposed to drink alcohol because it conflicts with some of my medication. I haven't found a zero alcohol beer here that I like so I was quite pleased to find this 'no alcohol' cider which actually tastes half decent. 

 
Wednesday, Day Four, saw us leave Hobart, heading north up the east coast for a night's stay at Swansea. On the way we stopped in at Port Arthur - no not the one that was besieged during the Russo-Japanese War, but the one that was a prison for transported petty criminals. I have to say that if you had to be in a prison 12,000 miles from your homeland in Mother England, there are many worse places to be than Port Arthur. Once you get over the stark appearance of the penitentiary buildings the place is pleasant enough and again we managed to get in ahead of the bus tours. It is a wonderfully peaceful place and we spent a very enjoyable couple of hours wandering around this UNESCO World Heritage site.

The penitentiary building

Looking down on the penitentiary from the guard tower

The commandant's house

The Asylum

The cell row in the separate prison

The convict church

Looking up through the Government Gardens

Looking across the bay at the complex 

We then headed north, doubling back a bit, and heading for Swansea, a small seaside town at the western end of Nine Mile Beach. On a lovely sunny afternoon we walked along the beach and I noted what nice fine sand it was..."no you cannot take it home!" was the instant response.

The day's drive.

The beach...

...with its lovely fine sand.

Day five will see even more interesting adventures.

Sunday, 10 March 2024

Bits and Pieces

In an effort to keep busy in the evening I have been finishing off a few bits that have been laying around for a while.

First up is a bunch of FPW French infantry that are destined to be used as skirmish stands. They were painted some time in November and were just waiting for me to get around to making their bases, which I did last weekend. So here they are...seven stands to add to the eight I already had.


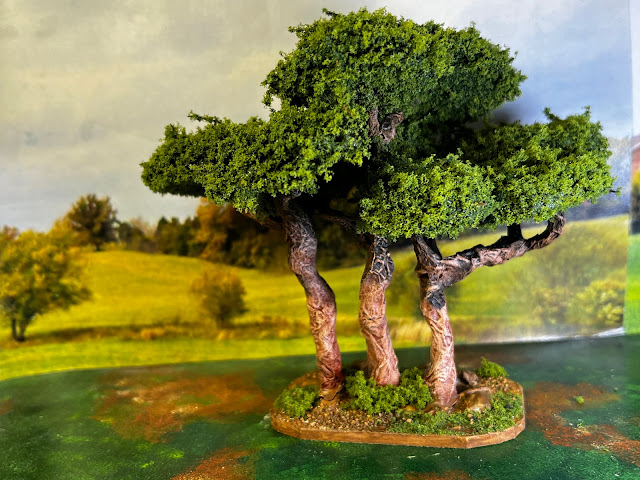
Next are two groups of trees, the first of which goes back much further - a few years in fact. I remember seeing a Wargames Illustrated photo (or maybe on a blog somewhere) of a strip with four trees and I liked the look of it. So I made the wire armatures, applied the toilet paper and PVA mix, painted them brown...and there they stayed, gathering dust...until now where they have been painted, based and had foliage added. 


Having made the stand of four and was so pleased that I made another strip of three.


This encouraged me to make one more piece, this time a bigger, right angled piece. I also made some trees with darker foliage.


This piece can be used to dress up a road junction (as below) the surrounds of a village or farm, or the edge of a field.


I can see me making some more pieces like this in the future.


Thursday, 7 March 2024

More Re-Basing

Following on from the rebasing of the four Confederate dismounted cavalry regiments, I have just completed five Union regiments.


I now have nine complete regiments of Union dismounted cavalry in the collection.

Monday, 4 March 2024

A Bit of Re-basing

Devoid of any new figures to paint I have undertaken a project that has been languishing for some time, the rebasing of my older ACW cavalry units to the same basing system that I used for my more recent efforts (shown here

First completed are four regiments of Confederate cavalry.


There are enough figures left over to make one more regiment, but I don't have any horse holders for them, so they will have to wait for a while.


When finished I will have two full brigades (nine regiments) of Confederate dismounted cavalry.

Thursday, 29 February 2024

What to do Now?

I know that many gamers live by the rule that the number of unpainted figures must always outnumber the number of figures you paint, regardless of the number you paint, but I have never been one for maintaining a large lead pile. Maybe it is my experience early in my working life as a buyer for a large wholesale organisation where my boss drilled into me..."stock turns, son, keep the stock turns high, that's the key to a successful business." Maybe it's the 'just in time' protocols of my current workplace. Maybe it's that frugality that comes from my Scottish grandmother. At various times in the past it was because of economic circumstances. 

Whatever the reason throughout the 54 years of my wargaming life I have always ordered just what I knew I could paint within a reasonable time period. In recent years I have turned this into quite a science with orders being timed to take maximum advantage of the credit period of my Visa card and to arrange for them to arrive just before the last item of the previous order left the painting table. It also allowed me to plan more carefully and take advantage of  the post free options that provided me with a 20-25% saving on base cost that would have pleased my grandmother no end. Of course all those plans fell apart during the pandemic when postal services fell behind and there were a few occasions of a completely flattened lead pile which compelled me to allow a greater buffer for a while.

The key to my success has been my project planning. Now this doesn't involve full blown planning with gantt charts, but it does involve a spreadsheet that extended out some three of four months detailing what and when was being purchased and and determined how long a purchase would take to paint at the rate of six foot, three mounted figures or one gun set per day. In fairness I always this obsessive, but when I was building my Crimean War armies (which were required for a specific game on a specific date) I needed to ensure that I figures arrived in a way that I could get them all painted in time while not stretching the finances and incurring the wrath of the Domestic Controller.

Now I find myself in an odd situation. For the first time since 2016, when I started managing a project plan, my schedule looks like this:


As you can see after 20 February there are no figures on hand, no purchases and no new projects on the books.

There are a few items outstanding in existing projects, namely:
  • Franco-PrussianWar
    • Prussian Generals
    • French Generals
    • French Dragoons
    • French Cuirassiers
  • Napoleonic Swedish
    • Generals
  • Napoleonic Ottoman 
    • Commanders
    • Artillery
These items are not yet released and no date for the release has even been hinted.

I am serious about living up to my resolution to cut purchases, but with nothing on the horizon, what to do? How will I fill my evenings?

I do have a few hobby related projects to work on. The main one is to complete the work on my games table, but due to constraints on health that can't be done probably until April and it is certainly not an evening task.

The table creates more opportunity for terrain work because by expanding it by one tile on each axis creates an issue with the quantity of terrain tiles because it means that to cover the whole table I will need 60 tiles whereas my current table only requires 45. The issue is that my current count of tiles is 70 and twenty of those are rivers or streams, so unless I want a river or stream on every table I need to add more tiles - 20 of them, twelve or fourteen of them to be just plain and the remainder plain with a road section, but again those are not an easy evening task. 

I do have a few rebasing and small terrain projects to undertake which will keep me busy in the evening for a while - although it is unlikely that they will keep me busy until those outstanding items get released.


Monday, 26 February 2024

The Final Hill

As mentioned in my last post about hills, I had enough materials on hand for one more hill, but I wanted something unique and multi-purposed. I wanted a basic 25mm (1") high hill with relatively gentle slopes on which I could mount three different tops:
  • A further gentle slope rising gently up to maybe another 25mm (1")
  • A wooded area on the crest
  • A rugged rocky crest with maybe two positions where troops could take post
The three tops could all used as stand alone pieces, but could also be 'plugged in'  to the main hill.

First thing to do was to cut the base of the what will be the main hill from a piece of 4.75mm (3/16") MDF that has been laying around for years. I cut it in a rough ellipse measuring 445mm (17.5") on the long axis and 350mm (14") on the short. 


I then sketched and cut the basic shape of the top area that is 240mm (9") by 200mm (8") from 3mm (1/8") MDF and then marked a line about 6mm (1/4") inside the outer edge. I bolted two more pieces of 3mm MDF to that piece so that they would not move and cut along the inner line with the jigsaw. The end result is a 6mm ring and three identical pieces that will be the top variants that will plug into the ring with a blade width tolerance.


I then cut three pieces of 25mm (1") polystyrene: one for the base and two for the tops. 


I then bevelled the edge of the base with a rasp to about 30 degrees as I had done with my other hills and glued the polystyrene to it. At the same time I positioned and glued the ring on top of the polystyrene of the base unit.


I also glued one of the smaller pieces of polystyrene to one of the tops.

Next I looked at the piece that will have the wood on it. With a hole saw I cut six irregularly spaced 35mm (1.5") holes from the plug, keeping the discs from each cut.

I cut and glued a piece of 0.5mm steel plate to the underside of the piece. Why? Well the trees will be fixed to the discs saved above and rare earth magnets will be embedded in the base of the disc so that they will lock into place, but can be removed for more easy storage.


This is a technique I have used before with woods (link).

All the glued items were then left over night to set.

The next day when all the glue was set I shaped the polystyrene of the base with a hot wire cutter. I also needed to apply some filler so that the slope extended evenly to the top of the ring. 

I shaped to rounded top and cut the irregular, rocky one.

To the edge of the base of the wooded top I fixed felt with an overlap of about 3mm (.25"), trimmed and drybrushed it. This will help it merge with the base when plugged in.


The floor of the wood was textured with sand, painted and various pieces of twigs and a mix of flock textures were added around the edge.


The trees were fixed to their discs, appropriately painted and textured, then their foliage was added, using the coconut matting and foam flock technique described here. Rare earth magnets were glued into their base. Finally I added a few stones and more foliage around the edges of the base.


For the rugged top I cut the polystyrene so that there were two added levels plus a gentle slope to access each level. A papier maché of toilet paper and PVA glue was added to some of the smaller near vertical areas, which were eventually painted in earth tones, and glued and drybrushed patches of felt on some of the flatter parts. Sand was added and painted in other areas that weren't going to be part of the rock face, which as usual was made of garden bark.


Finally the base and the round top were covered with felt and drybrushed.


I know that it makes placing figures on them easier, but I am not really a fan of flat topped hills, but just as I finished the three plugins I decided to make one more for variation - a plain flat top that creates a plateau.  This piece of the only one of the plugins that can't be used in isolation as an individual feature. 

Below are the various combinations of the modules plugged into the base.

The round top

Above and below the rugged top


Above and below the wooded top


The flat or plateau top

I did briefly think of extending the flexibility of this piece one more step by hollowing out the centre of the main hill and making it into a volcano, but that would have been silly...or is it? Were there any active volcanoes in Europe, on the east coast of North America or in Paraguay in the 18th and 19th century? Etna and Vesuvius are the only ones I can think of...