Pages

Sunday, 28 February 2016

Wars of the Roses Game

Today we played our first game for the year - a Wars of the Roses game. The concept behind the game was originally posted here http://stracmark.blogspot.co.nz/2015/07/wars-of-roses-scenario-idea.html, but the actual rules for the game were as follows:

The Forces 
Henry VII of Lancaster: 
 • One command base
 • One messenger
 • One unit of three stands of mounted knights 
Richard III of York: 
 • One command base
 • One messenger
 • One unit of three stands of mounted knights
Four Noble Retinues (Fauconburg, Talbot, Grey de Codnor, Audley) each of:
 • One leader
 • One unit of three stands of foot knights
 • One unit of three stands of billmen
 • Two units of three stands of archers. 
Mercenaries (not assigned) 
 • Two units of three stands of Crossbowmen
 • Two units of three stands of Handgunners
 • One unit of three stands of Pikemen


The Terrain 
The table contains six specific domains, each of which contains a village, farm or keep as a home base and each is about 1500mm apart. Each domain is has a logical boundary (stream, river, road, hedge row etc). The terrain is rolling with many hedged fields and a few woods. 

Deployment
Before the game commences six black backed cards, each one representing Richard, Henry and the four nobles, are randomly placed face down, one each in one of the home bases. Seven mercenary cards (one for each of the units and two blanks) are placed face down on the table in their start locations. The mercenary cards must be placed at least 500mm away from any of the player cards. 

At the beginning of the game the each player will draw a card from a second,  blue backed, stack of  Noble cards to determine which force they will command. All the noble cards on the table are then turned over and the units belonging to that command are deployed in place. All units deploy within 150mm of the limits of their home base. 

Mercenary cards remain face down until a unit, leader or messenger comes within 200mm of the card, at which time the relevant unit is placed on the table. 


Initiative
At the commencement of each turn Henry, Richard and any noble who has not declared allegiance will draw a card to determine the order of play. Once a noble has joined a faction, they will move with that faction. 

Declaring Allegiance 
Once the rival standards are raised, i.e once Richard and Henry are deployed, the players declare their loyalty.

And so the game develops, until one side concedes defeat or if Richard or Henry are captured or killed. 

Mercenaries that are approached by a unit, a messenger or noble (within 200mm) will roll 1xD6 and a score of 4,5,6 will see them join the approaching noble or messenger, otherwise will remain neutral this turn. Mercenary units will not move or fight until they have joined a faction. If all nobles join one of the Royals, all of the mercenaries will immediately move to join the other Royal. 

Treachery
There is no requirement for players to remain aligned to one side for any length of time, and may change sides at will. Similarly no one needs to respect a noble's neutrality and neutral nobles can be attacked by any faction. Neutral mercenaries, however cannot be attacked. 

Home Base Defence 
Home bases will have an intrinsic defence value equivalent to one unit of peasants (3 stands). The peasants are free to move from building to building within the home base. They are armed with bows but fight at a lower rate than retinue troops.

So how did our game go?
Richard and Henry appeared at diagonally opposite ends of the table and only Grey stood with Henry. To make matters worse for Henry, of the three mercenary cards near him, two were blanks! Henry and Grey decided to try to defend the line of the river.


Richard, with Talbot on the right, Audley on the left and Fauconberg in the centre, gathered up the remaining four mercenary units and marched up the table.

Audley, finding no opposition in front of him (baring a large flock of sheep - that caused a fair amount of comment) crossed the river easily, but then found it difficult to manoeuvre around the woods on the opposite bank. Talbot secured the high hill above the river and then edged forward to engage Grey.


Henry, hoping he could break through and get at Richard, who kept his mounted knights behind the lines, charged at Fauconberg with his mounted knights, driving back two units of archers, but took such heavy losses that he could push no further. The knights withdrew across the river.


Talbot pushed across the river and drove back Grey with some accurate archery, while Henry called "Rally on me!" and led the mounted knights into Audley's leading unit of archers, routing them. But again Henry's knights ran out if steam. 


However, the shock of the attack of Henry's attack must have shaken Fauconberg's resolve because he changed sides, attacking Richard and Talbot. Richard's knights easily beat Fauconberg's mercenaries back and Talbot, having forced Grey back, turned back to face the new threat.


Fauconberg's treachery soon turned against him as his command was slowly taken apart by Talbot and a unit of German crossbowmen. After a couple of turns his command collapsed and fled the field.

Richard then turned his attention to Henry and Grey. The writing was on the wall, and although Grey checked Talbot, Audley was largely untouched and pressed forward, destroying Henry's only mercenary unit. 

A final fight between Henry and Richard, led to Henry's demise. For his treachery Fauconberg was found hanging from a tree, while Grey, bound to a chair, watched with alarm as Richard and Talbot heated pokers in the fire.

Friday, 26 February 2016

Crimean War Russian Infantry

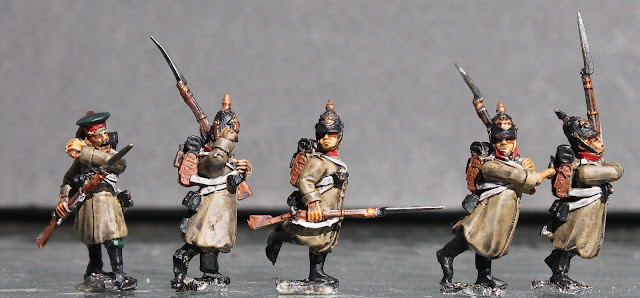
I have almost finished two battalions of the four I have to paint to complete my second regiment.

One of the sets that I use to make up the regiment is called "NCOs dressing the ranks". It features two NCO's, one with a baton and one pushing with a musket held in front of him. The other four figures are bunched up and being bullied into line. It is a really neat little set and I try to have one NCO and two of the figures in each battalion.


Wednesday, 24 February 2016

Back to painting

Having finished the Russian Church, I have moved onto the first batch of painting for February.

First up is some Russian Napoleonics. This is an army for which I have great nostalgia. It was my first Napoleonic army, and my first metal army for that matter. The original army was all Hinchliffe models and as I remember they cost me the princely sum of 7p an figure. I sold the army back in the late 1980's and ever since the Perry plastic figures came out I have been considering recreating it. Late last month I took the leap and here is the first of what will be twelve battalions.


Next is the Russian Crimean War army. The first two artillery stands and a couple of mounted officers from Great War Miniatures.


Finally there is the Russian Orthodox priest who will go with the church, and any of my Russian armies really. His head was originally an old (very old) Citadel villager with a Green Stuff beard added. The hands came from spares the Perry Wars of the Roses boxes. The rest of the figure I made from Green Stuff.


The second infantry regiment is in progress.

Monday, 15 February 2016

Russian Church, Part 10

The church is now painted and assembled.

In 13 days it has gone from this inspiration:


To this rough cardboard form:


To the finished product:


These shots, with only flash lighting, don't do the model justice, especially the gold spires, but you will get an idea until I have the chance to set up a proper "shoot".

One more step is required, to make the base, but I want to give this a little more thought. This may take a few more days.

Sunday, 14 February 2016

Russian Church, Part 9

All of the structural work on the church is now finished.

These three images show the model dry assembled in its final form.


I will leave the Emerkit and Green Stuff to cure overnight.

I had intended to construct the base before I painted it, but impatience has got the better of me and I will start the painting tomorrow.

Saturday, 13 February 2016

Russian Church, Part 8

One shouldn't take my lack of posts on this subject as a lack of activity. Quite the opposite, I have been particularly busy applying the small fiddly details that take a lot of time - largely because there is a need to wait for each part to cure before staring on the next part - but don't look all that much in photographs. 

So in the last few days I have finished the large spire, applying a total of 607 individual blobs of Green Stuff, flattened out to look like half-round tiles. To that same spire I have added the decorative cross. This last piece was sufficiently fiddly having to make the lower ball from EmerKit - I was too impatient and drilled it when it was only half cured, so is split on me and hand to be made again - the cross from plasticard and the upper ball from Green Stuff. For the middle ball I cheated and. "liberated" a glass bead from her indoors' beading stock.


The tiled area immediately beneath the large spire has also been completed and the spire mounted. 


I put on all the window frames. I had originally intended to make these ornate, but in the end made them quite plain, although in the finished product I may paint them to stand out.


I have added the wooden base to the smaller spire and tiled the roof - another 240 tiles. I also repeated the process for the decorative cross, although all of the balls in this case are beads.


All that really remains now is to fix the front spire and the porch roof, and then complete the basing work. Once that is done the whole thing can be painted.

Wednesday, 10 February 2016

Russian Church, Part 7

About a month ago I gave a job to one if my staff. It was a tedious job involving the reformatting of a 1,000 page document. Two days later she complained, "this will take me the rest of my life!" It wasn't true because the job is now complete. But after spending an hour and a half putting little green stuff tiles on three sides of the main octagonal spire, I know just how she felt!

It all came about because when I finally finished assembling the two spires, they just looked too bland.


Then I thought about putting tiles on them and I started on the big one first. So began the ordeal. Each little tile was made from a small ball of Green Stuff - about 1.5 mm in diameter - stuck onto the plasticard and then flattened out. Two hundred and twenty-two tiles later I finished three of the eight sides. But my God it is going to look fantastic when it is painted up!


Tuesday, 9 February 2016

Russian Church, Part 6

The last couple of day's work on the church has been on the roof. Most of it is finished now with just a small area of tiling to complete before the roof ridges are put on.


I have also made the basic shapes for the two octagonal spires. To make these I used the PC to draw  two octogons, with diameters of 50mm and 30mm and then drew the sides with a height of 60mm and 40mm. These were then printed to paper.


Then I glued the printed sheet to some placticard and cut out the shapes with a scalpel.


These roughly assembled spires will need some sanding and filling before any further work can be done on them.


The shot below shows the spires roughly positioned on the model.


Tomorrow night I will complete the roof and then commence the fine detail work around the window - perhaps the part I like the least.

Sunday, 7 February 2016

Russian Church, Part 5

Today's efforts have focussed on some of the fiddly bits.

I finished all the basic timber finish on the two octagonal bases for the spires. These are particularly difficult because I wanted to do them all in one hit and in doing so there is always the risk of putting your fingers on the surface you have just worked. Fortunately this did not happen this time.


I also textured the floor of the porch area, framed the door, put the facias on the porch roof and constructed the porch timber supports.


This image shows the porch roof and the timber supports dry assembled.


Next I will attack the roof areas and start figuring out how to make the spires.

Saturday, 6 February 2016

Russian Church, Part 4

Last night was a building free night, because I played a game, but this evening's work involved making the form for the porch roof and texturing the front edge of that piece. 


I then textured the two sides of the left hand alcove that I was unable to complete on Thursday, followed by the front door and porch, making sure that I left a blank space for the porch roof to plug into when the model is assembled.


I also did a little work on the front spire that required some adjusting because it was leaning slightly forward. This meant adjusting the thickness of the Emerkit so that on one side it was thicker on the top than the bottom, and vice verse on the opposite side.

Thursday, 4 February 2016

Russian Church, Part 3

I thought I would start this posting with more of a “how to” approach rather than “this is the result”.


The technique I use for making buildings has developed over the last thirty years and involves etching detail into an epoxy putty spread over a cardboard or MDF form.


First the tools and I use only five. Top to bottom in the image below they are:


• A pallet knife (in fact I use a rigid butter knife)

• A craft knife with retractable blade

• A scalpel

• An awl

• A custom tool like a flat blade screwdriver that allows me to press into the putty


I use two types of putty:


The first is a local product called EmerKit – a fairly course putty that is relatively cheap, safe to work in the hands, easily spreads across large areas and has a work time of about two hours (and cure time of three hours – although a full cure takes 24 hours).


The second is Green Stuff – a much waxier putty for fine or fiddly detail.


So for this evening’s work I start by mixing up some EmerKit with one part resin to one part hardner. After all of the years of using this stuff I know roughly how much I need to cover a given area, but I nearly always make sure that have some other project ready to go, just in case I mix up too much.


Using the pallet knife I spread the putty over the form to about a 2mm thickness. It is often necessary to wet the pallet knife to prevent epoxy from sticking to the tool. When it was spread across the form I trimmed it acordingly.  


Then, using the craft knife, I sketched out the line of any detail – in this case the upper edge of the stone work and the outline of the window.


I then cut out and removed the putty from the window area.

Next is the timber texturing. I started by simply cutting a series of fine horizontal lines to emulate wood grain. Then I cut deeper lines to define the edge of the boards. I then had to clean up the edges of the windows.


The final step is to use the second of my custom tools (the screwdriver like one) to create the stone effect, simply by pressing into the putty to create the outine of a stone, keeping things as irregular as possible. When this is finished I used the rounded end of an old paint brush to create a few dimples on the stones.


Then the epoxy is left to cure. Curing can be accelerated by heating in the oven (when her indoors is not around of course). That said, care has to be taken with the heating because if the item is heated to more than 100 degrees it can expand and bubble, destroying the surface. I usually set the thermastat to 75 degrees to avoid this. Under heat a workable cure can be achieved in about 15 minutes.


Now for the results for thie evening’s work.


There is only the front door and a couple of small walls to complete on the lower part of the structure. Then it is onto the spires and roof.