Pages

Thursday, 29 January 2015

Fresh Crimean Paint

My summer holiday painting project was the first batch of Crimean War French. 

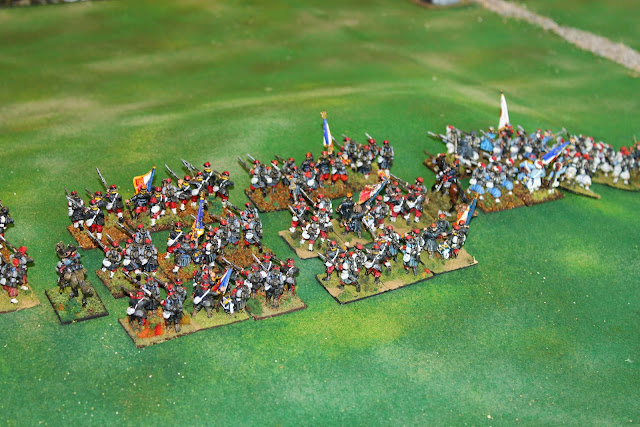
I have chosen to build Général de division Mayran's First Division from 2nd Corps at the Battle of Tchernaya.  This first batch of figures makes up Général de brigade de Peueux de Lavarande's First brigade, consisting of the 19th Chasseur à Pied Battalion and the 2nd Zouave Regiment.

For the zouaves I chose to use the Perry plastic ACW zouaves. The figures are not quite correct: The water bottle was different, the bayonet should be a sword bayonet rather than a triangular one, the drum should be of the African type (although some sketches show a standard drum) and there is no eagle on the standard pole. These few things I am happy to accept. So I bought one box plus six additional command frames. This gave me enough figures for all three battalions of the regiment. There were even two figures left over to make up the brigade command group.

The entire regiment
Brigade command

I wanted all of the figures to be advancing at slope arms and about one third would have fez, while the remainder had turban.
The First Battalion, 2nd Zouaves

The Chasseur à Pied were from the Great War range.

The 19th Chasseur à Pied battalion

With the same order from Great War I ordered Lord Raglan and his staff, together with Baron Osten-Sacken and his staff.


The Crimean War will take a back seat for a month or two, but when I start again, probably in May, I will split purchases between Russian and French.

Monday, 26 January 2015

Franco-Prussian War Game

Last week we played a Franco-Prussian War game. The scenario was based very loosely on the battle of Borny. The French were in retreat, preparing to cross a major river, when a Prussian force appeared behind them more rapidly than anticipated. Two French infantry divisions turned back to face Prussian corps.

The objective of the Prussians was to secure the road that led off the table toward the river crossing. The French objecitive was to deny the Prussians control of the road.

The terrain was relatively open with two parallel ridges. Between the ridges was a village. 

The French were permitted to deploy 350mm in from the table edge, with the exception of the six batteries of the reserve artillery that had to move onto the table after the first turn. The French chose to deploy on the reverse slope, with a division either side of the road. They chose to bring the reserve artillery on between the divisions, opposite the village.

The Prussians could deploy 300mm in from the table edge. Their divisional artillery could be deployed, but the six batteries of the reserve was in limber. They too chose to deploy either side of the road. The division on the right was to push one brigade through village. The reserve artillery and the cavalry brigade were also assigned here.

The initial Prussian deployment on the right.

The French position to their left, opposite the Prussians show above

For the first turn the French remained concealed behind the ridge, while their reserve artillery arrived on the table. The Prussians, meanwhile, deployed all their artillery while one brigade occupied the village.

The Prussians take the village

On turn two the French reserve artillery rolled into position. At the same time the French divisional artillery came forward to cover the reserve's deployment. This commenced a battle for fire superiority that lasted for the next four turns. At first the French guns held their own against superior numbers, but in the end the numbers began to count and the French batteries were being driven off or destroyed one by one.

With fire superiority achieved the Prussian right hand division prepared to step off. Then a battalion of French chasseurs à pied rushed forward and occupied a small farm on the Prussian flank. The Prussians were compelled to turn three battalions to neutrailise this threat, while the remaining nine battalions advanced.

The Prussian right advances

As the Prussian reached the foot of the ridge, the French pushed to the top of the ridge and opened fire, but failed to halt the Prussian advance. When they attempted to close the French stopped the advance with a second volley then counter attacked and drove back three Prussian battalions. But when the French attepted to push the advance further the Prussian gun mass held them in check.

At that moment the other Prussian division went forward. The brigade on extreme the left was abruptly halted by the French divisional artillery and pushed back, but the right hand brigade, assisted by some battalions from the other Prussian division, forced the French back.

The French right begins to give way

At that moment the Prussians on the right pushed forward again, gaining the flank of the French, driving them back. A large gap was opened in the French centre and the Prussian established themselves in a dominant position astride the road to the bridge. Unable to dislodge the Prussians the French broke off the action.

It was a good game lastng for six hours. It was good to see theses armies out if their boxes, for the first time since November 2012.


Friday, 16 January 2015

Franco-Prussian War Infantry Formations

Following on from a query on the Miniatures Page, I have included some illustrations of typical Prussian infantry formations in the Franco-Prussian War.

The first image shows the formation taken by the 9th Bavarian Regiment, covered by the 6th Jägers, prior to their advance into the woods opposite Langensoultzbach at the Battle of Froeschweiller. It shows three companies of the jägers in the advance (the fourth company was detached to support the artillery) led by a chain of skirmishers formed by one platoon from each of the companies, with the remaining two platoons formed 100m to the rear in company lines. Two hundred metres further to the rear were the 1st and 2nd battalions of the 9th Bavarian Regiment in line of companies, with the three platoons formed one behind the other. A further 200m back came the the 3rd battalion, in double column of companies, sometimes referred to as column of companies by half battalion.

The second image shows the 2nd and 3rd battalions of the 37th Regiment formed in double column of companies astride the Woerth-Soultz road with the, 4th company from 1st battalion attached.


In the third image the deployment of the 41st brigade is shown with the 1st and 3rd battalions of the 87th Regiment in the front and the 1st and 2nd battalions of the 80th Regiment to the rear. All the battalions are formed in double column of companies.

This image shows the Geman movement around Morsbronn. The two battalions of the 32nd Regiment are deployed forward as a heavy skirmish line with supports to the rear, while the 2nd and 3rd battalions of the 94th are formed in double column of companies to the rear. Three companies from the 80th Regiment are behind the 94th.


This final image shows the French 20th Chasseurs at Rezonville with an odd mix. The 1st company is in the skirmish line with 2nd, 4th and 5th behind in line, while the flanks are reinforced.

It should be noted that the use of the column of companies was generally only used to approach the point of combat, but it was a very common practice and the Germas Staff History is riddled with such references. There are examples of the French infantry attacking in this formation, but rarely did the Gemans remain in column once they came under small arms fire. To do so was quite against their tactical  doctrine.

Further Reading

There is no one book (that I have found) that gives a clear description of the formations of the Franco-Prussian War, but there is ample information on the subject if you are prepared to read some of the more obscure works out there. All of the works referred to here can be found in the Internet Archive.

A good place to start is the Geman Staff History The Franco-German War. It is heavy going and dreadfully biased (it is the victors writing a victorious history afterall), but it does describe the action often down to company level. 

The French Staff History La Guerre de 1870-71 is equally vaulable, not only because it contains the original reports of the various commanders, but also because if offers a critique. The downside of this work is that it is very difficult to read.

Boguslawski's Tactical Deductions from the War of 1870 is worthwhile, but doesn't go down into the detail that we wargamers often seek.

Henri Bonnal's Froeschwiller and La Manoeuvre de St Privat (from which the images here are drawn) are good sources, as is Lehautcourt's monumental 7 volume Histoire de la Guerre de 1870

Ardant du Picq's Battle Studies Ancient and Modern is worthwhile, but was published before the introduction of the Chassepôt and the change of French drill.

Helvig's Tactical Examples is interesting. Although it provides insight asto how units approached specific situations, it was published several years after the war.

Hohenlohe-Ingelfingen's Letters on... provides much discussion, but there is a fair amount of hero worshiping going on and needs to be read with a degree of caution.

De Lonlay's Français et Allemandes... is a colourful read, but not totally reliable.